

I thought for this one, I’d make this into a bit of a “How-to”, so to speak. Everybody loves a little bit of action, no?
I wanted to continue my earlier posts on automating your life — making sure the essential gets done based on a one-time decision and then never having to worry about it again.
The decision my wife and I made was: We’re going to use credit cards and pay them off every month. So why not automate this decision?
To do this, we’re going to go into the depths of our credit card company’s app and force ourselves to do it. Why hassle ourselves with writing a check every month? Or going into their website or app to send the money every month? Or even worse, only setting it up to pay the minimum payment — just so our credit score doesn’t get dinged?
No, no…we’re going to pay off the whole thing.
I mean, we’ve already made the decision to do it, might as well help use a computer to hold ourselves to this decision.
Of course, this requires some restraint in spending. Don’t put your Tesla Model 3 on the card unless you have the actual funds to back it up. But of course, this works in our favor as well, since you force yourself to also keep spending in check since you’re not relying on your credit card to provide a financial buffer.
So without further ado, let’s jump into it for one of my credit cards: Capital One
I only have one card with them, but as of the time of this writing (August 2018) I’ll show you the steps I take and then we can go from there. Today, I’ll be sharing how to do it on the Capital One App.
On the Capital One App
Step 1, Login
Login to the app, duh.
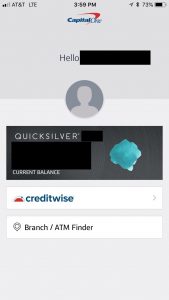
Step 2, Hit the card you’re interested in
Hit the card you’re interested in. For me, that’s just the Quicksilver card.
By the way, I’m using the awesome “blue splash” ![]() to indicate where your finger goes…
to indicate where your finger goes…
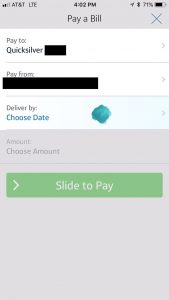
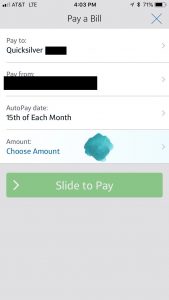
Step 3, Hit “Make a Payment”
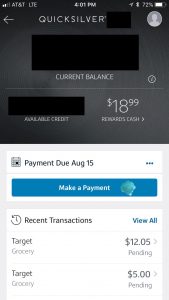
After selecting the bank account to draw from (or for me, it autopopulated since there’s only one account linked), click the “Deliver by:” button in Step 4…
Step 4, Hit “Deliver by:”
Step 5, Hit “Automatic Monthly Payment”
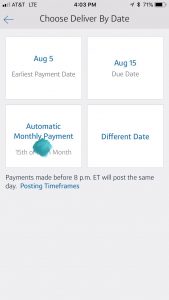
Hitting this starts the autopay cycle. You’re not just doing a one-time payment, you’re automating this forever…!
Step 6, Hit Choose Amount
Step 7, Hit “Last Statement Balance”
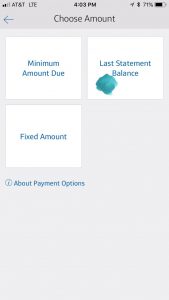
This ensures you’re paying off the ENTIRE balance — not the minimum amount and not a fixed amount, you’re going for the gusto. This also ensures you never have to pay any interest charges.
Step 8, Slide to (auto)pay!

Step 9, Confirmation Page
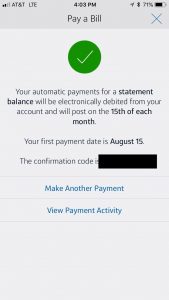
You’ve successfully set up autopay on your credit card! Yay! Take a victory lap!
Step 10, Extra Confirmation
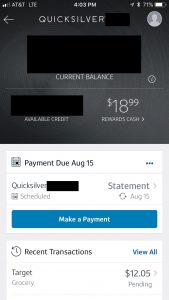
If you want to see an extra confirmation, go ahead and look back at your credit card’s information screen — see the scheduled payment, just sitting there above the “Make a Payment” button? There ya go! It’s all set up.
And that’s it!
So there ya go, it’s easy peasy, so easy you can do it from your couch. No need to lug out the ‘ol laptop for this one!
Some companies are harder than others, but I applaud Capital One for making this such an easy add to any of their accounts.
Have you enabled autopay yet?
Let us know in the comments below! Any troubles?